
I have been sewing since the age of 5, which seems impossible when I think about it, but I know it to be true because while in kindergarten, my best friend’s mom owned a fabric store. The store was in bustling downtown Oconomowoc, Wisconsin, and Karen and I would regularly hang out there. Karen’s mom held sewing classes in the shop, and so we would make duffel bags and other odds and ends in the classes. Throughout my life, I have had several hiatus periods from sewing, but I always end up going back to it sooner or later. When I was in college, my grandmother Blouin passed on to her great reward, and I inherited her magnificent Singer 401A.

This was made in the last great heyday of sewing machines with steel gears. It is built like a tank, which is a good thing because I still sew things similar to duffel bags: backpacks, handlebar bags and panniers for my bike; and I have been known to alter heavy canvas work pants for the man-friend on several occasions. This machine can sew eyelets on a whisper of tulle, or plough through five layers of denim all in the same day!
Recently I have been able to put this experience and solid prewar industrial design to good use in a slightly unusual bookbinding project. I had a client bring in a leaf from a parchment psalter that was badly warped. It had been the prize possession of a relative, and she had inherited it. Unfortunately, the previous framer did not tend to the extreme warping of the piece, but just framed it as it was, attaching it to the mat with some now-gooey fabric backed tape.
A couple summers ago, I participated in the fantastic class at the International Preservation Studies Center on the preservation of parchment taught by the incomparable Sheila Siegler. This was a truly comprehensive class, looking at the physical makeup of parchment, the types of coatings some scribes used to make it take ink better, ways to cook parchment scraps to make gelatin-based glue, and so on. We had over 20 articles to read on the history, physical makeup, and historical context of parchment, and many hands-on exercises in diagnosing common problems of parchment and repairing them, including one of the more common issues with the material: flattening the warping that so often happens to it. So I felt like I would be the perfect person for this client. Here’s a shot of the parchment leaf before treatment:

sad state of affairs
The relative who originally purchased the piece made some notes about it on the back of the original frame’s kraft paper backing. Lots of notes!
 I really liked that this sheet was included in the original frame on the back side. It contains all that the client’s family member had learned about Gregorian chant, where she bought the piece and why (including some information on the tear along the bottom edge of the parchment!), and about how she stored the piece and why it became warped. But the page was simply placed in an extra piece of acidic kraft paper that was taped to the back of the frame. The client didn’t actually realize it was there; I drew attention to it in our first consult, and she was then able to read it. You had to pull the page out of the pocket to read it, and the paper itself was already fragile.
Based on my experience in the parchment conservation class I took, I was very comfortable with the flattening of the parchment. Most likely due to improper previous storage, there were areas of ink on the front side that were flaking off, so I had to be extremely careful. I would have liked to flatten the piece a second time, but I felt that the risk of losing ink would be too great. One additional wrinkle in this project was that when the parchment was flattened, it had grown over 2cm taller, and the original mat had to be recut to accomodate the new size.
Due to some extra research I did on mounting systems for parchment, I was able to come up with a good way to mount the parchment to the mat, using expandable mylar joints that would allow the parchment to shrink or expand according to its will (and, sigh… it certainly will). Here is a closeup of one of the expandable joints:
 The slits in the mylar allow it to expand if necessary. There is a tab made of kozo paper that was looped through a slit in the mylar and attached with wheat paste to the front and back of the parchment leaf. The final attachment looked like this:
 I was happy with how the project was turning out so far. But what would I do with the page with the notes written by the client’s relative? Making a typical folder or four-flap enclosure that would not be attached to the frame, and could possibly be misplaced or otherwise separated from the item seemed less than an ideal solution. I mulled over the issue for a few days while working on other projects.
Finally, I remembered a presentation given by one of the conservators at the University of Washington conservation center I had attended while on a tour organized as part of the national conference held by the Guild of Book Workers, called Standards of Excellence. We visited the new conservation lab at the University of Washington, which is fabulous and amazing in itself: http://www.saarch.com/projects/uw-book-lab . Standards was a huge rejuvenating force for me this year. I loved getting to visit Tacoma, which I probably wouldn’t have visited otherwise (though I’ve been to Seattle numerous times). I enjoyed talking to people on the bus on the way to the tour and back. I got to see lots of bookbinders I haven’t seen in years. I got to take care of some important shopping errands among the vendors for my bookbinding business. I also met some new vendors, which was fun. The hotel, with all its examples of glass art on every floor, seemed perfectly suited to GBW. Every Standards is great for me because I truly believe in its educational mission, but this year had a particularly exciting energy.
While visiting the lab during the tour, one of the conservators showed us a preservation solution she had devised for some of the library’s larger photographs, particularly those in wide landscape format. The photos needed strong support from below while allowing visibility from above, so she layered thick folder stock for the support layer and mylar on top… and she sewed them together! (!!!) I thought this was pretty brilliant. Here it is in action, accompanied by their sewing machine station:

Simple zigzag stitch with invisible thread
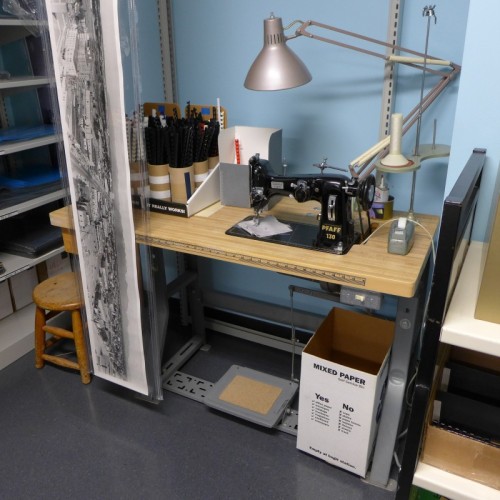
The conservator at UW was able to do all kinds of interesting things with sewing the mylar that might be more difficult with an encapsulator, accomodating extra large sizes and making pockets for long polyester stiffening rods (shown in the hanging enclosure at left).
After doing some tests of different threads with mylar and folder stock, I arrived at a way to use this technique to preserve the handwritten page of notes from the client’s family member. I ended up using plain tan-colored sewing thread instead of the invisible kind:
 And here’s a shot of the full reverse side of the frame:
 You can see from this photo that the original frame was just about exactly the size of the parchment leaf. This page from a very old psalter is in a much better home now, and as it is destined for foggy San Francisco, the client and I will be monitoring it carefully to make sure the attachment system is working.

As I mentioned earlier, this was a slightly unusual project for me. It didn’t fall under the typical set of repair work I tend to do, especially recutting the mat for this framed item. But in many ways I was able to use the knowledge I’ve gained throughout my life, from the conferences and classes I like to attend where I learn more about my field, to my own personal background in things like sewing, something I’ve been doing since childhood. I feel fortunate to have a job where I get to serve people’s needs using so many of the things I can bring to each project.

I have that same Singer. Its a graceful, beige tank that sews my book sigs, clothing, and just about anything else.
Met you at the SFCB holiday faire this year . Your work is fantastic.
Yes, it was so nice to meet you! I love your work! That’s amazing we have the same machine. We need to start a 401A fan club!
Juliayn. what a nice and thoughtful post. It was so great to reconnect and reading your post took me right back to learning about the sewing technique that was used at UW. it’s so great to put in practice something that you just learned! Look forward to hearing about more projects!
Thank you! It was so nice to see you and hear about how things are going at work and at the Morgan. Hope to see you again soon!