Tag Archives: book repair

In the studio

Unfortunately I haven’t been able to update this blog too much over the past year, but I wanted to share a few of the things I’ve been working on. I wish I had more time for blogging, but there has been no rest for the wicked (bookbinder), as I’ve been teaching or doing private work nonstop. I’d like to use this space to catch up a bit with some of the exciting projects I’ve been very lucky to have worked on over the past year. I hope my sharing something about them will make others feel inspired.

Custom box for memorial cards

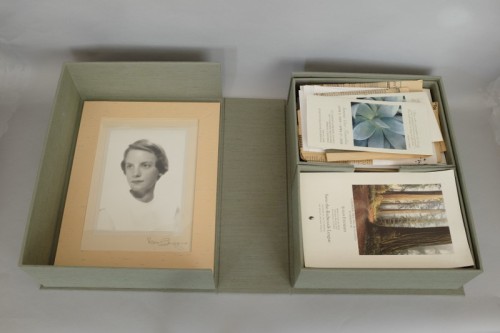
One of my dearest repeat clients, a photographer who specializes in family portraits, came into my studio one day with a small paper bag filled with remembrance cards, other mementos, and a beautiful glass framed portrait that all needed to go into a box for a local family. This was a challenging project, since all the items were of widely varying sizes and shapes. I made a drop spine box with two separate compartments, a four-flap, and created a new frame out of contrasting book cloth for the portrait.

Remembrance Box Compartments

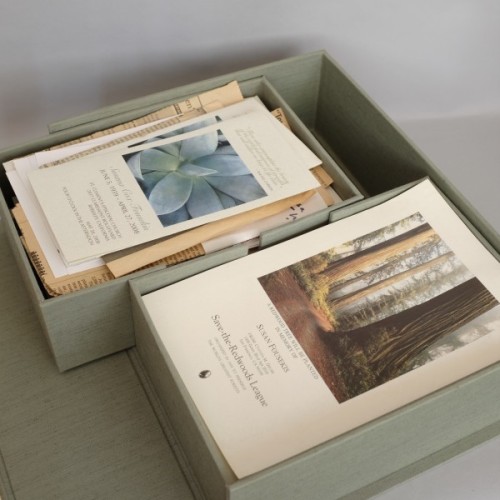
I created two side-by-side compartments to house most of the cards and letters. They were in honor of a woman who had a deep connection to the area’s redwood forests, so I felt a bit of a connection to her, too.

Remembrance Box Inside View

This is how the inside of the box would be viewed when opened.

Remembrance Box Front

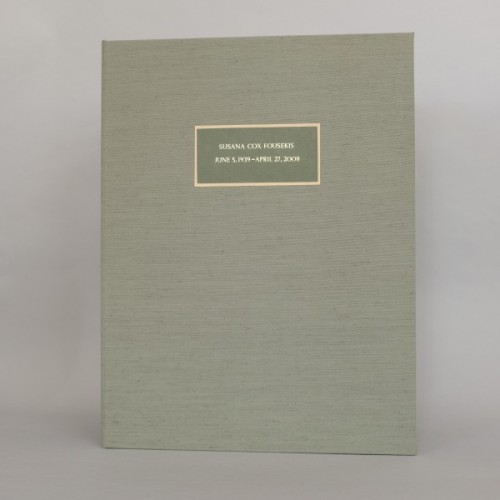
This was the front of the box, with the woman’s name stamped in gold.

Working large

Last year I ended up doing a series of three oversize repairs for completely unrelated clients. At the outset, the complexity and challenging nature of each one seemed overwhelming, not to mention three at once. Here are some anecdotal photos of them, with brief explanations, though I might like to post an entire entry at some point, just on these projects.

Illustrated Atlas of Alameda County

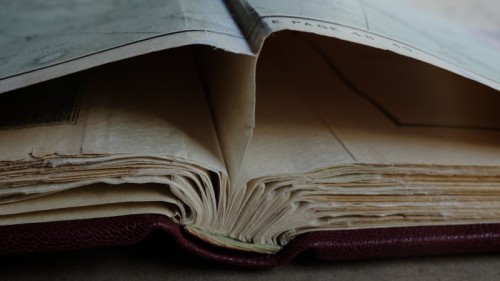
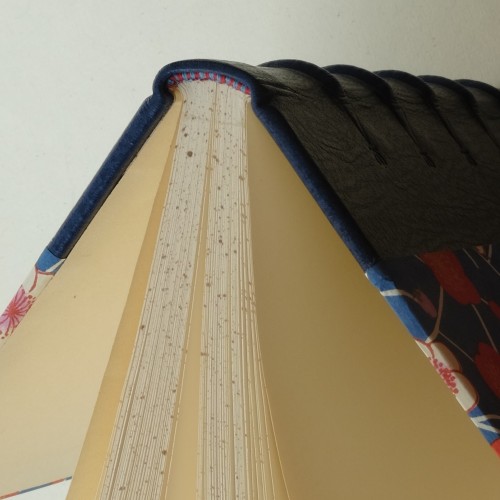
This was an illustrated atlas of Alameda County from the 1800s. There were foldouts, text folios, single sheets and even a few double foldouts. The inside of each foldout had a map, and the outer sides of the map had charming illustrations depicting farms or other points of interest in the area of that map. Each page was a slightly different width, calling for the complicated series of stubs, hinges, and guards you see in this detail photo.

Big Book Board

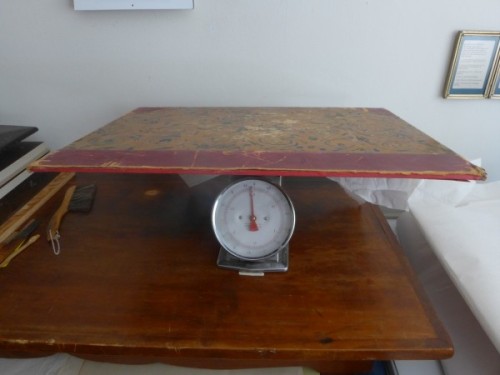
This picture shows the mind-bending immensity of the largest book I have ever repaired (one cover board of it, anyway). I weighed the cover and a single board alone weighed over 6.5 pounds. The main challenge in repairing this particular book was to handle it throughout the repair process with the care it needed in spite of its heft. Good thing I exercise!

Monograph of the Ramphastidae before

This was the initial state of the third of these large books I repaired. All three books also presented challenges simply in the documentation I do for my internal record keeping. I had to move the camera so far away that I couldn’t get very clear photos at times. I took a lot of detail shots to fill in the gaps.

Monograph of the Ramphastidae After

This is the previous book after treatment. Two of the three books required a technique known as a leather reback; the Atlas got a brand new set of covers, since its original covers were severely water damaged.

Prelinger Treasure

Some of the first book conservation I did after moving out to the bay area was for the Prelinger Library, and last year, I was able to do some more work for this innovative collection. They house certain volumes of government publications discarded by other libraries for lack of space, and have happened on some interesting books. One of these that happened into my studio for a time was a record of a US military expedition from Missouri to San Diego conducted in 1841, passing through and reporting heavily on the region now known as New Mexico and Arizona. A researcher at the Prelinger felt the book was important enough to donate the funds to have it repaired, and so I did my best.

p1060099

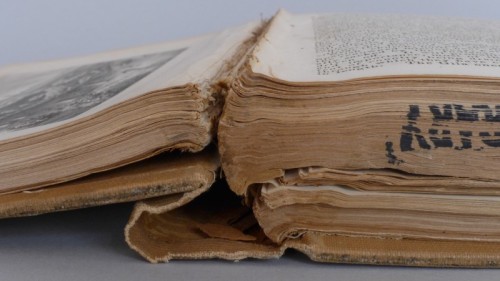
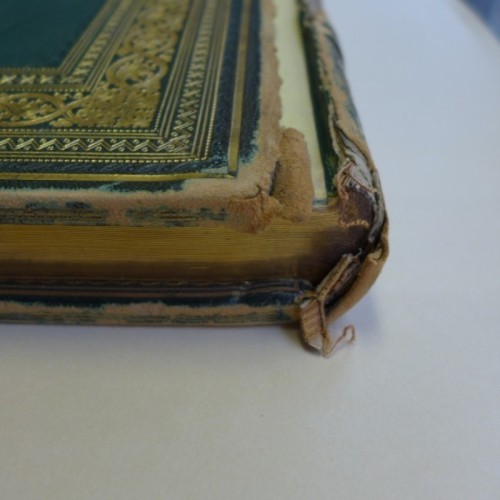
This was the initial condition of this book, with ragged folds at the spine, broken sewing in several places, an odd section of stubs with no pages deforming the rest of the textblock, and many tipped-in illustrations in various stages of attachment.

p1060294

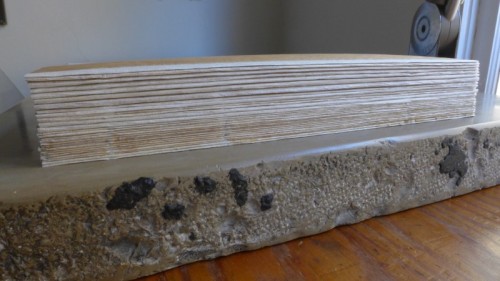
I carefully took apart the entire textblock page by page, then applied paper made from kozo fibers with wheat paste to give the folios a stable footing to be resewn and rebound. Note that only about two thirds of the signatures are in this photo-there were over 40 that all needed extensive guarding.

p1060312

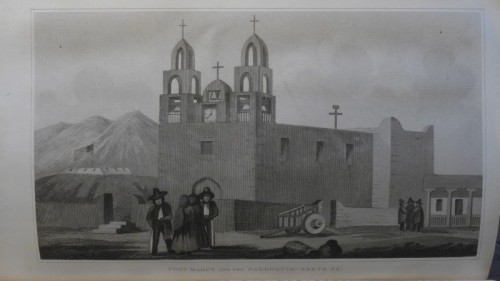
Typical illustration from the text, one of many. Old Santa Fe. If you think the illustration is interesting, you should read the text! For a military report, it is a real page turner, filled with encounters with Native Americans of several different tribes as well as investigations of plants, geological formations, and animals that were completely foreign to the group of topographical engineers authoring the report. This book is available to see, read, and handle at the Prelinger Library. No academic credentials required.

Prelinger After

This is the spine after treatment.

Prelinger After Cover

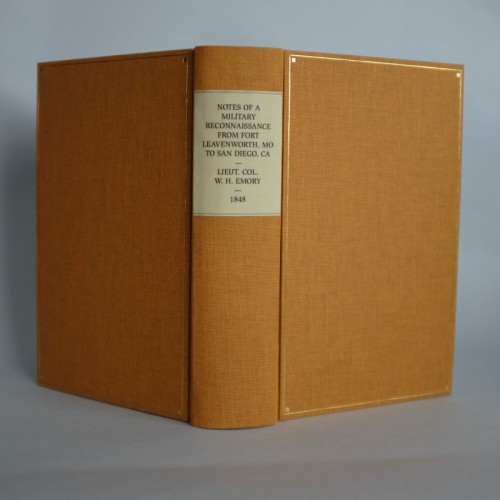
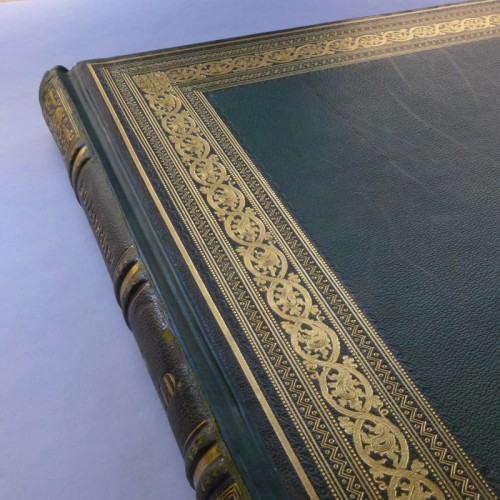
This is the cover after treatment.

New bookbinding class at SFCB

I have been teaching classes in bookbinding at the San Francisco Center for the Book since 2011, and have most often focused on offering a foundational series of classes to give students a slice of what I got at the North Bennet Street School. I don’t see any use in hoarding what I know. I have met so many fascinating people while teaching, some becoming clients, friends, or both! So last year, I decided I wanted to push things a step further and offer an additional advanced class in leatherwork for bookbinding. This would be an idealized (for me anyway), traditional style of binding in many ways, though the class would be limited to two or three days of in-class time, depending on which option the Board of the SFCB voted to approve. Lucky for me, they approved the longer three-day version, and the class was held two weekends ago, over the holiday weekend to allow those who travel from long distances to take the class in three successive days.

lacedonboards2

This binding included lining the boards, sewing on four raised cords, using loose guards, ploughing, sprinking the edges, sewing silk endbands, lacing the boards through twice, and of course covering the spine in specially-pared leather. We also did some blind tooling around the raised bands for a traditional look.

Quarter Leather Binding x6

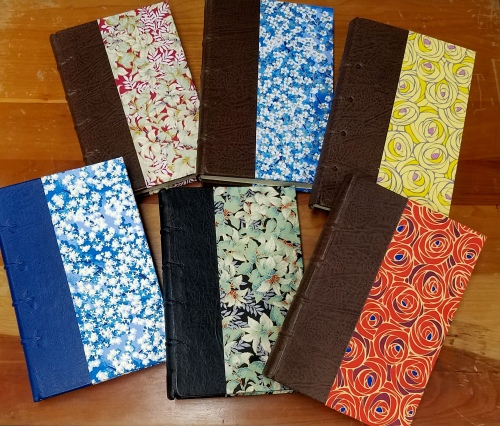
These were all of our books at the end of the class! Everyone survived, and I think we all had a good time, too.

Life has been full; I look forward to more fun on Book Island!

2 Comments

Filed under Classes I've taught, My projects

Deep Listening and Bookbinding Practice

OK, at this point I feel I need to come clean a little bit and admit I have hobbies. I feel guilty taking time away from bookbinding which for so long has been the primary occupier of my mind and heart. But sometimes I find it’s healthy to get out of the studio, step away from the bone folder…  One of the side pursuits I enjoy is singing. For the past few years I’ve been fortunate enough to make the acquaintance of the good people of the Cornelius Cardew Choir, and sing with them in rehearsal and performance. Cornelius Cardew was an eccentric English composer of abstract music in the utopian vein. Readers of my blog may already know I enjoy and take inspiration from abstract, or sometimes called new, avant garde, noise, what-have-you, music… As you can tell, I don’t get too involved with labels, but ever since I was a teenager and discovered the radio program New Sounds, I have loved it. So as soon as I moved out to the bay area and discovered the Cardew Choir, I started attending rehearsals. The signature event of our group is the performance every year at the Garden of Memory. The Garden of Memory is an extraordinary musical event held in a columbarium every year on the summer solstice. Yes, that’s right, a music event in a building erected to store urns containing ashes of the deceased. Oakland has an unusual columbarium designed and built almost a century ago by a famous lady architect, and that’s where we perform in the event called Garden of Memory.

Circle of singers: some are regular choir memers, others are general public. This was very early in the evening; the circle is rather small at this point

Circle of singers: some are regular choir members, others are general public. This was very early in the evening; the circle is rather small at this point

Many of the urns are shaped like books, recalling a passage from Laurie Anderson: "When my father died, it was like a whole library had burned down"

Many of the urns are shaped like books, recalling a passage from Laurie Anderson: “When my father died, it was like a whole library had burned down”

It’s an extraordinary setting for an extraordinary piece: the choir invites participation from the audience, and due to the nature of the larger event in which we play a small part, audience members sift through the crowd and come and go as they like. The piece we perform was created by Pauline Oliveros and is called the Heart Chant. The general instructions for the piece are as follows: Rub your hands together to warm them. Place your right hand over your heart. Place your left hand on the back of the person to your left (thus a circle is created). Sing and hold a single tone for a full length of breath (though without strain). That’s pretty much it. The pitch we as choir members choose is often based on a practice our confounder calls “pitch shopping”: listening to the pitches of the rest of the group, and choosing one that is comfortable for your range (though you can initiate a new one if you feel it’s necessary). The performance can continue as long as the performers desire it; we generally perform from about 5:30-9:30 pm (phasing individual singers in and out to take breaks). Last year, the performance continued longer, since there were so many joining in; we even had to create a second circle to accomodate all who wanted to participate! As the performance continues, it evolves based on who is present at which time, and what tones they (we) are singing. We pick up on each others’ pitches and perpetuate them, provided they are within a comfortable range. As each note lasts the length of one breath, you need to choose something you can live with for that long. It is surprisingly harmonious. We all hear, or hear about, those singers who are always off pitch in a group, right? Well, this event/piece never ceases to amaze me in how closely people listen to each other, and how wonderful it always sounds.

There are so many great things about this piece, and practicing it at least once a year as I do, I learn something new every time. It is a powerful experience to practice listening to others in this era when most people seem to be wearing headphones alla time. In all vocal work, it is necessary to listen, since your voice is not like a piano where you press a key and the same note comes out every time. It requires a lot of focus and concentration, because you must listen and sing at the same time.

Bookbinding requires being a good listener

Thinking about this process, it struck me how similar it is to conservation, teaching, and bookbinding in general. In conservation, listening to the object is the first step in treating it. You must take pre-treatment photos that tell you the item’s history and what its weaknesses and strengths are. You inspect it further, and write about how you see it, and what your plans are for fixing the problems as you see them. As you treat the item, you are continually ‘listening’ to it: the thickness of the paper, the depth of the tear, the qualities of the original sewing, the nature of the boards and covering materials. What will hold and what won’t? You need to pay close attention to the item in front of you in order to achieve a harmonious result. Extending the metaphor, your work must also match the pitch of the item’s.

I find this metaphor to work in teaching as well. It’s important to meet each student where they are, so to speak. The results of being able to do this, when possible, are really satisfying. I’m so happy when my students find bookbinding to be something they can use and incorporate into their lives in meaningful ways.

Soon I will be leaving the bay area briefly to teach some conservation workshops in the San Diego area. It’s exciting, but there are always some unknowns involved in teaching far away. I’m excited to have this experience in deep listening to guide me through!

Some of my recent work

I recently repaired a first edition of Twelve Years a Slave. While the repair of this book probably merits its own blog post, I will just briefly include a couple photos here. It was very important to save every tiny piece of the original cloth spine, which was quite a challenge.

The original front cover

The original front cover

The original spine. There was a lot missing, but I saw some potential here because most of the titling was still there.

The original spine. There was a lot missing, but I saw some potential here because most of the titling was still there.

The end result of the spine: I was able to harmoniously tone the material underneath the original spine material to blend in. It is still obvious that the book is old; no one is being fooled here. But it is all intact; the areas with titling have been preserved, and the integrity of the object has been maintained.

The end result of the spine: I was able to harmoniously tone the material underneath the original spine material to blend in. It is still obvious that the book is old; no one is being fooled here. But it is all intact; the areas with titling have been preserved, and the integrity of the object has been maintained.

The rest of the covers have also received some attention though kozo paper that has been toned to match. The cover boards will now be able to provide adequate protection for the text.

The rest of the covers have also received some attention though kozo paper that has been toned to match. The cover boards will now be able to provide adequate protection for the text.

More about my workshops in San Diego

More about Cornelius Cardew’s graphical scores

More about Pauline Oliveros and Deep Listening


Leave a comment

Filed under Around, About, and Through, My projects

Books Are Round; and, My PSA on PSA

Many of the materials that go into the making of a book are flat: paper, board, bookcloth. Of course, all of these things, including the finished book, are at least three dimensional. But have you ever heard of a book being round? A-round, sure… for some of us more than others. But really, truly, round? In my work repairing old books, I have seen many a round book, meaning the book is no longer a book per se–it has become a receptacle. This is most often the case with family Bibles, but it happens to other books as well.

I recently had the opportunity to repair one such book for a class I taught in book repair. I usually shop for books for students to repair at Friends of the Library sales, and that was where I found The Complete Poems of Paul Laurence Dunbar. I wanted to write about my work on this book for several reasons, the primary one being that people are often surprised at what I do for a living, and don’t believe that books can in fact be repaired. As you will see here, even when a book has so many problems that they can’t all be repaired at once, the book’s condition can be so vastly improved as to make a huge difference to the future of it. I also wanted to write about this book because my work on it brought up some interesting issues in conservation I thought worth discussing. Finally, there were some things I learned while repairing this book that I wanted to share.

The Complete Poems of Paul Laurence Dunbar front cover

front cover

Inside front cover

front pastedown: some gummed kraft tape, early cloth medical tape, acid migration…

inside rear cover

rear pastedown…early pressure sensitive adhesive worthy of further study

title page and photogravure portrait of Dunbar

title page and photogravure portrait of Dunbar

These informal photos taken prior to treatment may begin to give you an idea of what I mean when I say this book is a receptacle. In these four photos, we already see six newspaper clippings. And as I continued to observe the book’s condition, I came across many more clippings, pamphlets, three small pages of handwritten notes for a radio address, a church directory, and so on.

Post-treatment: the book plus all the inclusions that weren't glued, taped, or nailed down

Post-treatment: the book plus all the inclusions that weren’t glued, taped, or nailed down

Paul Laurence Dunbar was born only seven years after the end of the Civil War. His parents had been slaves, so he was the first generation of free African-Americans in his family. He wrote poems, novels, and plays, some in dialect, some not. He died young of tuberculosis, dying well before the Harlem Renaissance gained steam. However, many writers from the Harlem Renaissance onward have cited Dunbar as an inspiration, and many feel that he was America’s earliest great African-American literary figure. It makes sense to me, in view of all this, that someone chose to place all their most important notes, desires for self-betterment, news articles on Wendell Willkie, and even Christmas greetings within this volume.

Something I happened to learn while I was repairing this book, through an unrelated string of concurrent events, was how a photogravure is made. Though common in image output generation in book production, I guess I never had the reason to study the making of photogravures before. Someone I know told me he had made some, and when I said I didn’t know what they were, he described them. At that point, I realized that the book I was working on contained one. A pretty nice one, I thought.

Photogravure Portrait of Paul Laurence Dunbar

A photogravure is basically a way of using a film positive to burn an image into a copper plate suitable for use in printing with ink, combining photography with intaglio printing.

Photogravure

I’m happy with how my repair of this book came out–the book opens well, and all the pages have been stabilized. I’m even more pleased with the repairs completed by my students in the class. The students did so well we even had time to create protective four-flap enclosures for our books, so in my case, all the inclusions now have a contained place to reside that does not compromise the opening and closing of the book’s covers. However, there is one topic that is not addressed in the limited time available in that particular class: tape removal. Tape removal often requires the use of toxic solvents, requiring a vacuum table, a fume hood, and/or a fitted respirator: equipment and materials we do not have at SFCB. The Complete Poems of Paul Laurence Dunbar has several kinds of very old tape that are all causing various kinds of damage to the paper. The worst instance of this is on the reverse side of the lovely photogravure portrait.

There are many types of tape, and they all age in different ways and at different rates, causing different effects to the paper they’re stuck to. Some of the adhesives dry out and flake off or can be gently scraped off, as was the case with the opaque white tape on the inner front pastedown. Others melt into the fibers of the paper they’re stuck to and create an inextricable bond, and an irreversible stain. This process can take decades, but once it happens, there is not much to be done about it. Holding this page up to the light shows where the tape on the reverse side of this page is located, and where the stain might be headed.

Tape StainLet this be, then, my one and only Public Service Announcement on Pressure-Sensitive Adhesive. Just say no, okay? It does not matter if the product says it’s archival. ‘Archival’ is an even vaguer marketing term than ‘organic’. Believe me, I understand the challenges of possessing an item in need of repair. The temptation to use a quick fix is strong. There are many book repair manuals out there that instruct on the use of tape–unfathomably. But, as common sense dictates, if it seems too good to be true, it probably is.

Books are really amazing. The more I repair and make them, the more respect and awe I have for the ones that stick around. I have seen and repaired many fine and treasured books, but the ones that amaze me most are the ones that seem the least likely to succeed. The Complete Poems of Paul Laurence Dunbar, despite all appearances, has “good bones”: it was sewn through folds and was printed on decent paper. And despite the copious use of tape by one of its previous owners, I was able to put it back together and give it a gentle push down the road. When things slow down, I may be able to give it some attempts at removing the tape, but for now, the tape will have to stay where it is, unfortunately.

New beginning

2 Comments

Filed under Around, About, and Through, My projects

Nifty Folio Repairs

Hello again and apologies for the long absence. Since I last added to this blog, Book Island broke loose of its moorings and took float, settling just a few cattails from its former position. Improvements include more space for my growing family of bookbinding equipment (more on that in a later post) and for holding mini-workshops; and proximity to a large vintage Wedgewood gas stove. There are many tradeoffs to living and working under the same roof; working for oneself also has its pluses and minuses. Not having to commute long distances, and being able to do things like let bread dough rise or soup simmer while working at the bench are things I would identify as pluses. Of course, it is a more solitary lifestyle; and there’s the whole tax/admin angle that has to be dealt with. In any case, it’s where Book Island is at right now. After sharing some tips on guarding and folio repair, I will include some snapshots of the new studio and workspace.

One of the great advantages to having formal training in bookbinding was the multitude of sidebar-type techniques we all learned. Being in a two-year, full-time bench-centered program afforded my class a fair amount of time for goofing off in the nerdiest way imaginable. In teaching us paper and book repair and conservation, my teacher gave us lots of bonus extra tips and methods for saving time and making a better result. Some of them may be in wider use than I am aware of, and some I go through phases of using heavily and then not using for a long time. One of these is something I have nicknamed the Folio-Mat. Like many studio aids in bookbinding, it is simply fabricated from a few pieces of scrap materials you probably have laying around not currently helping anybody, but it is completely out of the question to discard: binder’s board, buckram, mylar, and your favorite archival spun polyester. Oh, and don’t forget the Scotch 415 double stick… Yes, from these humble beginnings, you too could create wonders! Observe…

Step one: Place a strip of pasted repair tissue on the center line of the board

Step one: Place a strip of pasted repair tissue on the center line of the board

Step two: place the folio or signature to be guarded on the tissue , amtching up the fold line with the center of the repair tissue

Step two: place the folio or signature to be guarded on the tissue, matching up the fold line with the center of the repair tissue

Step three: lift the buckram flap, and fold the whole flap over the folio or signature, thus bringing the otherwise wiggly half of the pasted repair tissue cleanly over the fold

Step three: lift the buckram flap, and fold the whole flap over the folio or signature, thus bringing the otherwise wiggly half of the pasted repair tissue cleanly over the fold

Step four: lift the buckram and return it to its original positions, and-voila!-your folio or signature has an unwrinkled, completely flat guard. Trim height to size when dry.

Step four: lift the buckram and return it to its original positions, and-voila!-your folio or signature has an unwrinkled, completely flat guard. Trim height to size when dry.

The Folio-Mat (trademark pending) allows you to easily unite two leaves separated by time and neglect in order to prepare them for sewing. I recently had to guard an entire textblock this way and was able to save some time. It was much easier to jog the separated leaves to the foredge, avoiding much of the stepping out leaves often do when regrouped into signatures. This paper was quite soft and fragile, having been in a mostly-disbound state for many years (burns and fading could be seen on the edges of the pages sticking out from the stack). To say this book was in tatters would be an understatement. I’m not sure the pre-treatment photos quite express the causes for trepidation I felt when approaching the repair… I’m sure we’ve all been there. It was very rewarding to see how it came out, however.

Before treatment, foredge is in tatters.

Before treatment, foredge is in tatters.

Spine is tattered and battered, with many loss areas to outer leaves

Spine is tattered and battered, with many loss areas to outer leaves

Post treatment: top edge lines up much better, and you can see the bright yellow inked edge

Post treatment: top edge lines up much better, and you can see the bright yellow inked edge

no more tatters!

no more tatters!

Lovely illustrations now come through

Lovely illustrations now come through

Spine functioning normally

Spine functioning normally

Book lays flat and can be read without damage to the pages. Success! Thank you, Folio-Mat.

Book lays flat and can be read without damage to the pages. Success! Thank you, Folio-Mat.

More fun from Book Island:

New space with expanded equipment family: Ursa Minor (little nipper) on the far left, next Ursa Major (big nipper); Kensol now has its own homemade table with two castors. Workshop table is new too, as are the rudimentary tool kits mostly aquired from the Japantown mall. Come visit!

New space with expanded equipment family: Ursa Minor (little nipper) on the far left, next Ursa Major (big nipper); Kensol now has its own homemade table with two castors. Workshop table is new too, as are the rudimentary tool kits mostly acquired from the Japantown mall. Come visit!


2 Comments

Filed under Bookbinding techniques, My projects

Road trip!

A few weeks ago, I got to help a friend move out east to go to grad school. Two of her oldest friends in the area had access to a Chevy conversion van and trailer, and are dyed-in-the-wool campers, so with their  preparation, all of her earthly belongings, and my inborn skill for long car trips, we set off on the classic American road trip.

But several days before, I got a phone call from a woman who needed to rebind a road map as a gift. Somehow I worked her project into the necessary preparations for my trip, viewing care for a map (perhaps superstitiously, I’ll admit) as good luck for the upcoming adventure.  Here are some before-and-after snaps of the book.

cover

old back cover

Although the client said it would be ok to toss the original covers, I wanted to save the Wall Drug sticker on the front and the full US map with driving distances on the back, so I did some paper repair before sewing and putting on the new covers. I think it was worth it!

new cover

new inner cover

The back cover had lots of tears. Although one side was plastic- coated, I used wheatpaste and kozo tissue instead of heat- set tissue. It took the repair very well. You can see (or can you?) the tissue going just south of International Falls, then it takes a turn north above Thunder Bay and Nipigon. The map was quite dirty, having obviously been well-used on many trips. I did some dry surface cleaning, but did not attempt any stain removal.

paper tear

paper repair

Leave a comment

Filed under My projects